Keep serial pins free!

This weekend I did some final troubleshooting on my first wordclock. I had the problem that every time the display was updated all LEDs flickered a little. Very annoying, especially when there is no change.

Finally it hit me: I had connected the 74HC595 chips to the pins 1, 2 and 3. I guess I just wanted to “start” somewhere. What I didn’t account for, is that Arduinos serial port is accessible via pins 0 and 1. They are even labeled with RX and TX. So, everytime I sent data to my computer over the serial line it also went out on pin 1, which is connected to the 74HC595, hence the flickering.

Long answer short: Don’t use pins 0 and 1. Except for serial connections of course.
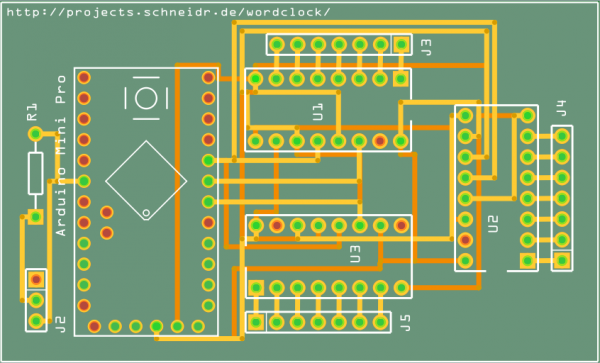
Circuit board for the wordclock

Yesterday I was playing with Fritzing to create a circuit board for the wordclock. Building it on the breadboard was easy, but the auto routing on the PCB-layout drove me nuts. Today I tried it again, loaded the file, repositioned the components on the circuit board a little and guess what … it worked on the first try. This is how the circuit board in the next version of the wordclock may look like:

It is designed for an Arduino Mini Pro, which is by far the cheapest Arduino variant I could find and which is sufficient for this purpose. U1, U2 and U3 will hold the 74HC595 ICs, J3, J4 and J5 will connect the LEDs. J2 is the connection for the DCF77 receiver.

I guess next I’ll have to learn how to etch my own circuit boards.

Controlling the LEDs with a 74HC595 chip

I finally got the 74HC595 chips and decided to do a dry run on a breadboard. I used the schematic I made earlier with Fritzing and just rebuilt it, with a couple of LEDs on every chip. I used the code from this blog as a base and it worked on the first try. Now I have to adapt this code for my purposes.

Don’t panic, the test setup looks worse than it is 🙂

Thoughts on connecting the LEDs

This is a summary of some thoughts I had on connecting the LEDs to the Arduino. When I read about charlieplexing I was amazed how many LEDs I could control with so few pins on the Arduino. Then I realized the downside of this technique: Essentially I can only light a single LED at a given time. Sure, there are a couple that can be lit simultaneously when they don’t share any pins, but setting those up would be a nightmare. So I started to group the words. Which words have to be lit when? Continue reading Thoughts on connecting the LEDs